Adding pictures is quite fantastic and super fun in the canvas app. There are multiple ways to add pictures
Camera control – that opens up the camera on the user’s device
Another way is Attachment control – easier to implement
The attachment control is a file uploader, which allows uploading the images in all canvas app allowed image formats. This behaves accordingly to devices like using a phone, tablet, or computer.
On Phones or tablets, this brings a pop up that allows
Open camera
Choose from pictures
Choose actual files
In such devices, this gives more flexibility, but on computers, it opens up a file loader that allows selecting any picture from the computer
Let’s see how we can implement the images uploader
Step 1 - Open the maker portal ((https://make.powerapps.com/) and create a new app.
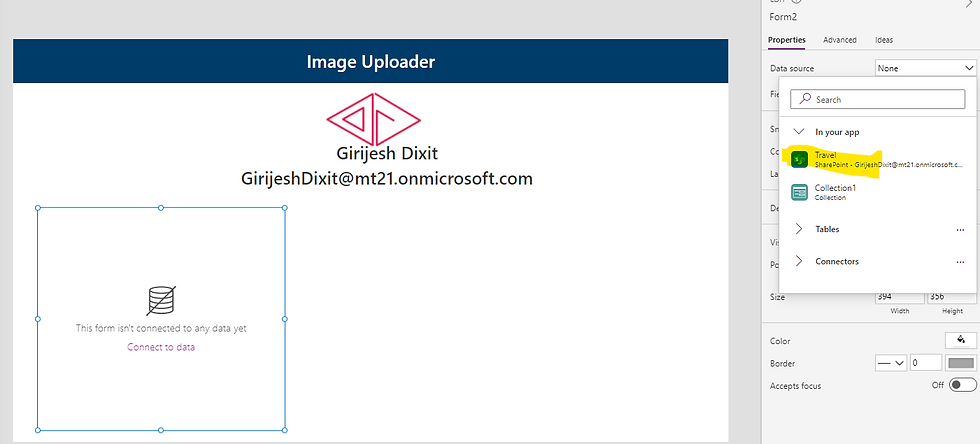
Step 2 - Insert a form and set the data source
![](https://static.wixstatic.com/media/018f16_c5ba797df88643ba8f0bd6f6abfa3f87~mv2.png/v1/fill/w_980,h_437,al_c,q_90,usm_0.66_1.00_0.01,enc_avif,quality_auto/018f16_c5ba797df88643ba8f0bd6f6abfa3f87~mv2.png)
![](https://static.wixstatic.com/media/018f16_5d47a37af089413c8e547f0ac38b9df2~mv2.png/v1/fill/w_980,h_444,al_c,q_90,usm_0.66_1.00_0.01,enc_avif,quality_auto/018f16_5d47a37af089413c8e547f0ac38b9df2~mv2.png)
Step 3- Change the form mode from edit to New
![](https://static.wixstatic.com/media/018f16_4231c2ffd1c44c75b3360857e2230cbd~mv2.png/v1/fill/w_980,h_343,al_c,q_85,usm_0.66_1.00_0.01,enc_avif,quality_auto/018f16_4231c2ffd1c44c75b3360857e2230cbd~mv2.png)
Step 4- Rename the Control as Images
![](https://static.wixstatic.com/media/018f16_07dda3d8f5d74fee85d2d7f3d2a529d1~mv2.png/v1/fill/w_980,h_482,al_c,q_90,usm_0.66_1.00_0.01,enc_avif,quality_auto/018f16_07dda3d8f5d74fee85d2d7f3d2a529d1~mv2.png)
Step 5- Insert a blank horizontal gallery to display the uploaded images
![](https://static.wixstatic.com/media/018f16_8b21e36e85c845c698b6fab8e5874b28~mv2.png/v1/fill/w_980,h_628,al_c,q_90,usm_0.66_1.00_0.01,enc_avif,quality_auto/018f16_8b21e36e85c845c698b6fab8e5874b28~mv2.png)
Step 6- Set the data source as a collection
![](https://static.wixstatic.com/media/018f16_9c17b26bf9514daeb1bd82735cc7d072~mv2.png/v1/fill/w_980,h_374,al_c,q_90,usm_0.66_1.00_0.01,enc_avif,quality_auto/018f16_9c17b26bf9514daeb1bd82735cc7d072~mv2.png)
Step 7 – Insert the Media – Image, to show the images
![](https://static.wixstatic.com/media/018f16_1dc8b71abfdd483b906b40c1fb321fc1~mv2.png/v1/fill/w_980,h_659,al_c,q_90,usm_0.66_1.00_0.01,enc_avif,quality_auto/018f16_1dc8b71abfdd483b906b40c1fb321fc1~mv2.png)
Step 8 - Set image property in formula bar “Image = ThisItem.value
![](https://static.wixstatic.com/media/018f16_664995409d7e4ef490cea8ce75e7a049~mv2.png/v1/fill/w_980,h_437,al_c,q_90,usm_0.66_1.00_0.01,enc_avif,quality_auto/018f16_664995409d7e4ef490cea8ce75e7a049~mv2.png)
Step 9- Save the app and hit the play button.
Source Code - Please download the app from this link Github
Happy learning!!
Comments